
Restrict Pages and Content to Crypto or NFT Holders: The plugin allows you to restrict access to specific pages and content on your website to only certain cryptocurrency or NFT (Non-Fungible Token) holders. This feature is designed to provide a way to monetize your website content and provide exclusive access to select users.
To use this feature, simply specify which pages or content you want to restrict access to and select the required cryptocurrency or NFT for access. The plugin will use the user’s Metamask account to verify ownership of the required cryptocurrency or NFT, and restrict access accordingly.
The restrict pages and content to crypto or NFT holders feature provides the following benefits:
- Monetization: By restricting access to specific content, you can monetize your website and earn revenue from users who are willing to pay for exclusive access.
- Increased engagement: By providing exclusive access to select users, you can increase engagement and create a sense of community among your users.
- Security: The access restriction is enforced using the user’s Metamask account, providing a secure way to verify ownership of the required cryptocurrency or NFT.
Setting up Token/NFT Based Access Restrictions with the “Crypto” WordPress Plugin
For websites that deal with cryptocurrencies and are looking for a secure and efficient way to restrict access to specific pages or content, the “Crypto” WordPress plugin can be an ideal solution. This plugin offers a feature that enables website owners to restrict user access based on the tokens or NFTs available in the user’s Metamask wallet.
In this article, we’ll take a closer look at how to set up token/NFT based access restrictions using the “Crypto” plugin.
Step 1: Choose Your Access Restriction Option The “Crypto” plugin offers two access restriction options – based on Web3Domain availability or any other NFT/tokens. Choose the one that best fits your needs.
Step 2: Configure the Restrictions Once you have selected the restriction option, the next step is to configure the restrictions. To do this, log into your WordPress dashboard and click on “Crypto.” Then, click on “Settings” and navigate to the “Restrictions” tab. Here, you can select the token/NFT that you want to use to restrict access.
Step 3: Assign Access Restrictions to Pages or Content Once you have selected the token/NFT, you can assign access restrictions to specific pages or content. To do this, go to the “Pages” or “Posts” section of your WordPress dashboard and select the page or content that you want to restrict access to. In the “Publish” section, you’ll see an option to restrict access based on the token/NFT you selected in the previous step.
Step 4: Test the Restrictions After you have set up the restrictions, it’s a good idea to test them to make sure everything is working correctly. Try accessing the restricted pages or content with a Metamask wallet that does not contain the required token/NFT and see if access is denied. Then, try accessing the same pages or content with a Metamask wallet that does contain the required token/NFT and see if access is granted.
Web3Domain Access
What is Web3Domain?
Web3Domains are domains that live on a public blockchain and give users complete ownership of their stored data. The main benefits to owning one are simplifying crypto transactions by replacing wallet addresses with the domain name and easily creating and hosting websites on web3.
The WordPress plugin “Crypto” can restrict users from accessing certain pages on a website based on the presence of specific Web3Domains in their MetaMask wallet. As a website administrator, you have the option to limit access to your site’s pages only to those users who have a specific Web3Domain in their wallet.
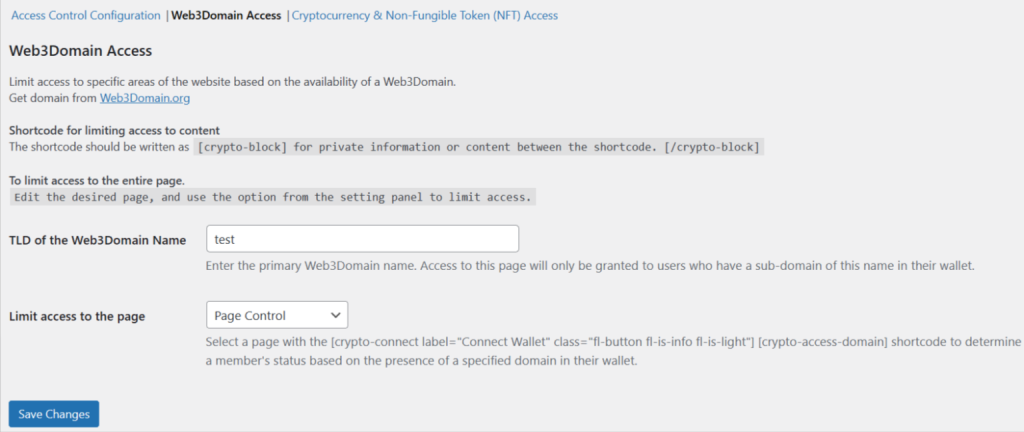
To set up this restriction, you must first have your own TLD or any other TLD that has already been minted. Once you have logged in to your WordPress Admin Dashboard, navigate to the “Crypto” plugin settings by clicking on “Crypto,” then “Settings,” and finally “Access Control.”
In the “Access Control” tab, select the option “Web3Domain Access.” Then, in the sub-tab “Web3Domain Access,” enter the desired TLD of your Web3Domain. After this, select the page you wish to limit access to by using the shortcode [crypto-connect label="Connect Wallet" class="fl-button fl-is-info fl-is-light"] [crypto-access-domain].
The function of this page is to check the domains specified in the settings, and if the desired domain is found in the user’s wallet, it will grant them access to the rest of the website.
To restrict access to specific pages or content on your site, you can use the shortcode
For example:[crypto-block] This content is private and only accessible to special users with the required Web3Domain. [/crypto-block]
By using the “Crypto” plugin in this way, you can effectively restrict access to your website’s content to only those users who have a specific Web3Domain in their MetaMask wallet.
NFT/Token Access
Cryptocurrency and Non-Fungible Tokens (NFTs) are revolutionizing the world of online transactions. With the Crypto plugin for WordPress, you can now restrict access to specific pages or posts based on the presence of specific NFTs or cryptocurrencies in a user’s metamask wallet. This article will guide you on how to set up the “Cryptocurrency & Non-Fungible Token (NFT) Access” option.
Step 1: Choose “Cryptocurrency & Non-Fungible Token (NFT) Access” in “Access Control” tab:
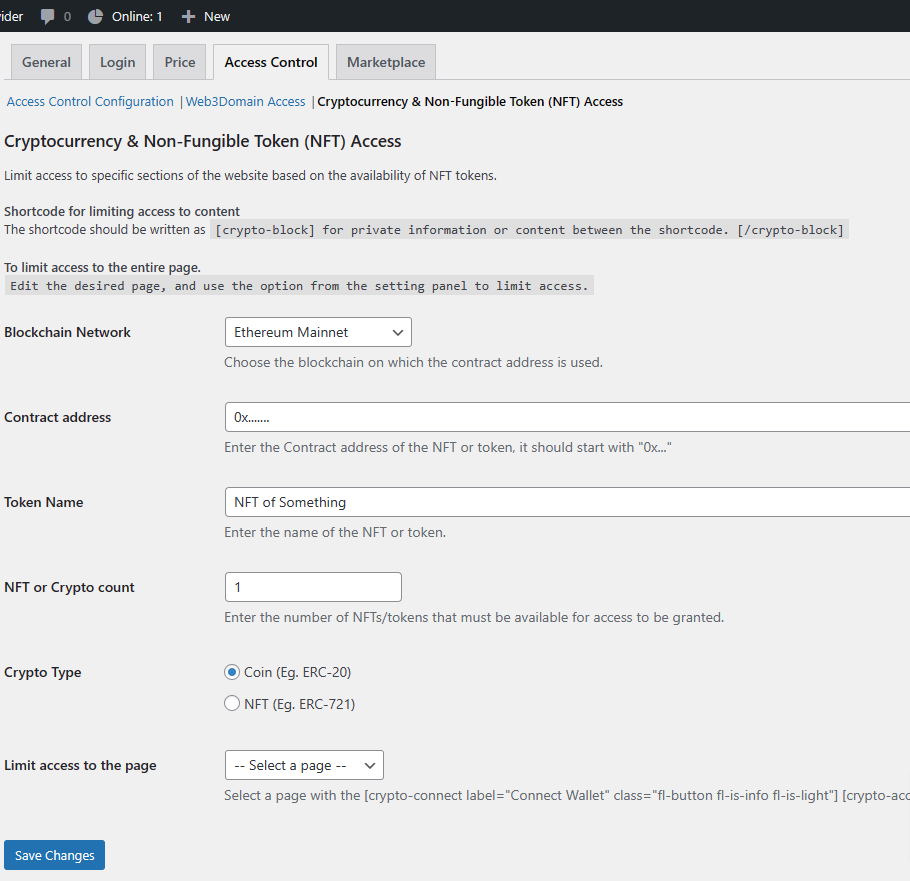
After logging into the WordPress Admin Dashboard, navigate to the “Crypto” plugin. Then, click on “Settings” and “Access Control” Tab. Choose the option “Cryptocurrency & Non-Fungible Token (NFT) Access.”
Step 2: Configure the settings for the “Cryptocurrency & Non-Fungible Token (NFT) Access” option:
The settings tab for “Cryptocurrency & Non-Fungible Token (NFT) Access” includes the following:
- Blockchain Network: Choose the blockchain on which the contract address is used.
- Contract Address: Enter the Contract address of the NFT or token, it should start with “0x…”
- Token Name: Enter the name of the NFT or token.
- NFT or Crypto count: Enter the number of NFTs/tokens that must be available for access to be granted.
- Crypto Type: Select between Coin (Eg. ERC-20) & NFT (Eg. ERC-721)
- Limit access to the page: Select a page with the
[crypto-connect label="Connect Wallet" class="fl-button fl-is-info fl-is-light"] [crypto-access-nft]shortcode to determine a member’s status based on the presence of a specified domain in their wallet.
Step 3: Use the shortcode on a page or post:
Once the “Cryptocurrency & Non-Fungible Token (NFT) Access” option is configured, you can use the shortcode [crypto-block] on a page or post to restrict access to specific content. The content between the shortcodes [crypto-block] and [/crypto-block] will be accessible only to those users who have the specified NFTs or cryptocurrencies in their metamask wallet.
Conclusion:
With the Crypto plugin for WordPress, you can now restrict access to specific pages or posts based on the presence of specific NFTs or cryptocurrencies in a user’s Metamask wallet. By following the steps outlined in this article, you can easily set up the “Cryptocurrency & Non-Fungible Token (NFT) Access” option and enjoy the benefits of blockchain-based access control.